Building a Multishot Dart Airgun
Here is an advanced ball valve airgun project I did one winter:
This airgun is a breech loading airgun that gets 10 shots before needing a recharge standalone . With a optional tank, it would get 31 shots with no pumping in between. I would charge it to 250 psi and shoot it until it dropped to 150 psi. Velocity would start at ~250 fps and drop down to ~195 fps. This is with fairly heavy darts, about 80 grains. Much better results can be had by using higher pressure, up to the 600 psi the valve is rated for. Even with lower pressure, it is well suited for hunting small game up to 20 yards away.
The idea behind this airgun is to use just enough air for each shot to accelerate the dart the length of the barrel, but not so much that there is a strong muzzleblast. This results in very quiet shots and effecient gas consumption. This is accomplished by placing a small firing chamber between two ball valves. One ball valve meters air from the main chamber into the firing chamber. The other releases the firing chamber into the barrel, resulting in a shot. Here's a look at the mechanism:
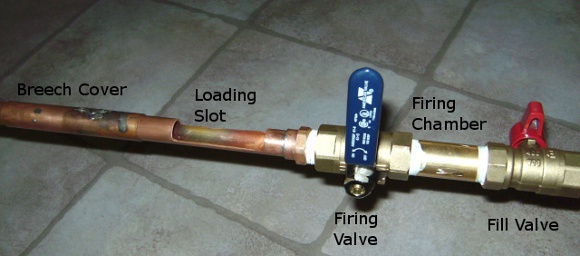
Lets begin with the breech. I constructed it by cutting out a slot in a length of 1/2" type L copper pipe large enough to slip a dart into. The breech cover is made from a piece of 1/2" repair coupling. It may take a bit of sanding to get it to slide on. I waited to add any grease until after I soldered a 1/2" npt male thread adaptor to the end of the barrel. The thread adaptor allows the barrel to screw onto the firing valve, which is a 1/2" full port ball valve. The firing chamber is made from a 2" length of 1/2" brass pipe nipple. This then screws onto the fill valve, completing the action of the gun. To fire, the firing valve must be in the upright position. The firing chamber is then filled by opening the fill valve briefly, then shutting it. Load a dart and slip the breech cover over the loading slot. The airgun is then ready to fire. Repeat the process until the air pressure drops off to a point where your shots are dropping too fast.
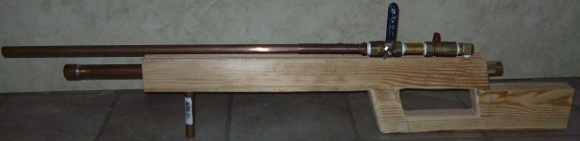
Of course, to get multiple shots, you must have a supply of air. This is partly accomplished by a large air chamber which is under the barrel. Here's what it looks like:

The large copper pipe under the barrel functions as the onboard air tank. This is what allows you to get 10 shots without any other air source or pumping between shots. It connects to the action of the airgun by a 1/2" street elbow, a 1/2" -> 1/4" bushing, and a 1/4" T fitting. On the other side of the T fitting, I attached a quick disconnect to attach the airgun to my compressor or extra air tank.
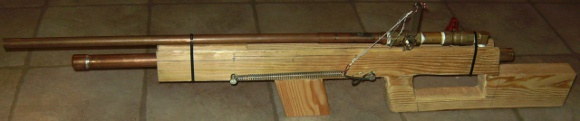
To make the airgun accurate as well as more powerful, I needed to add a stock and trigger mechanism. The stock is made from a piece of 2x6 board. The trigger is a simple mechanism consisting of an extension spring, a string, and a bent piece of 1/8" steel rod for the trigger/sear. You can see a picture of the trigger mechanism in the cocked position in the first picture of this page. The last picture on this page shows it in the fired postition. Here's what the airgun looked like sitting in its freshly made stock:
I added a piece of wood between the barrel and air chamber. I then attached the action to the stock with cable ties. Not the most elegant way of doing it, but it held securely and blended in when I painted everything black. I cut the basic shape of the stock out using a jigsaw and rounded it out with a hand rasp. To inset the upper part of the stock to fit the air chamber, I made several passes over a circular saw with the blade high enough to cut a groove that would fit flush with the bottom of the barrel.
To get even more shots and more freedom from pumps and compressors, I took an old aluminum CO2 cylinder and adapted it to be used with this airgun. Here's a photo of what that looked like:
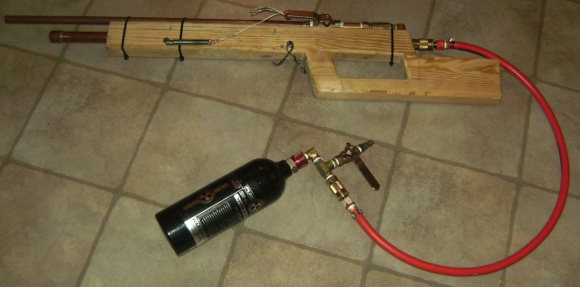
The hose is a high pressure hose rated to 300 psi, the type you buy by the foot. I used hose barbs and clamps to attach swivel quick disconnects to either end. This gives more mobility, as the CO2 cylinder is placed inside a backpack. Keep in mind I did not use CO2 with this airgun, only 250 psi air. Talk about a good system for small game hunting and target practice. It isnt the best or only way to make a multishot system, but it is probably one of the easiest ways with common hardware store parts. Here's a video of it before I added the onboard chamber and stock:
Here's a way to make darts that are waterproof and work well with the pressures this airgun uses:
